Turn AutoCorrect On/Off How to Enable or Disable AutoCorrect in Microsoft Word
Microsoft Word's AutoCorrect feature is a valuable tool for streamlining your writing process. It automatically fixes common spelling mistakes and typos as you type, saving you time and ensuring accuracy. Here's how to easily control this feature.
By default, AutoCorrect leverages the spell-checking dictionary for the language you've selected in your Word document. You have the flexibility to enable or disable this feature whenever you need. Here's how to adjust your Word Proofing settings:
1. Open Microsoft Word: Launch the application.
2. Open a Document: Either create a new document or open an existing one.
3. Access the File Tab: In the Word ribbon, click on the 'File' tab (top-left corner).
4. Navigate to Options: Scroll to the bottom of the File menu and click on 'More', then select 'Options'.
5. Choose Proofing: In the Word Options window, select 'Proofing' from the left-hand sidebar.
6. Open AutoCorrect Options: Click the 'AutoCorrect Options' button.
7. Go to the AutoCorrect Tab: In the AutoCorrect dialog box, make sure you're on the 'AutoCorrect' tab.
8. Enable or Disable: To enable AutoCorrect, check the box next to 'Replace text as you type'. To disable it, uncheck the same box.
9. Save Changes: Click 'OK' to save your settings. AutoCorrect will now behave according to your preference.
Customize AutoCorrect Adding Entries to the AutoCorrect List
Beyond enabling and disabling, you can customize AutoCorrect by adding your own frequently misspelled words and their correct replacements. This is especially useful for words or phrases that you commonly mistype. Here's how: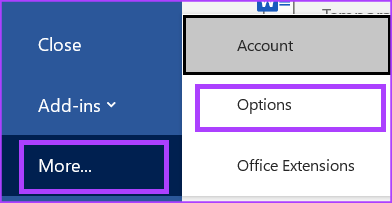
1. Open Microsoft Word: Start the Word application.
2. Open or Create a Document: Either open an existing document or create a new one.
3. Access the File Tab: Click the 'File' tab in the ribbon.
4. Navigate to Options: Scroll to the bottom of the File menu, click 'More', then 'Options'.
5. Choose Proofing: In the Word Options window, click 'Proofing'.
6. Open AutoCorrect Options: Click on the 'AutoCorrect Options' button.
7. Go to the AutoCorrect Tab: Ensure you're on the 'AutoCorrect' tab.
8. Enter Your Replacement: In the 'Replace' textbox, type the word or phrase you frequently misspell.
9. Enter the Correct Spelling: In the 'With' textbox, enter the correct spelling of the word or phrase.
10. Add the Entry: Click the 'Add' button to save your new entry.
11. Save Changes: Click 'OK' to save your changes. Your custom AutoCorrect entry is now active.
“Customizing AutoCorrect saves time and ensures greater accuracy in your writing by correcting common errors automatically.
Microsoft Word User
Explore Further
Enhance your Word skills with these related guides:
How to Hyperlink in Google Docs
Learn to add links to your Google Docs documents.
Instagram Stories vs Highlights: Know the Difference
Understanding the key differences between Instagram Stories and Highlights.
Edit AutoCorrect Deleting Entries From the AutoCorrect List
Sometimes, you might need to remove an entry from the AutoCorrect list. This is simple: follow steps 1-7 from the 'Adding Entries' section above and then follow the steps below:
1. Select the Entry: Scroll through the list of AutoCorrect entries and click the one you want to delete.
2. Delete the Entry: Click the 'Delete' button.
3. Save Changes: Click 'OK' to close the dialog box.