Why 2FA Matters Why Enable Two-Factor Authentication in Gmail?
In today's digital landscape, securing your Google account is crucial. Two-Factor Authentication (2FA), also known as 2-Step Verification, provides an essential layer of protection against cyber threats. This guide will walk you through the simple steps to enable 2FA and safeguard your Gmail account.
2FA adds an extra layer of security by requiring a second verification step, such as a code sent to your phone or an authentication app, in addition to your password. This significantly reduces the risk of unauthorized access, even if your password is stolen. With 43% of breaches targeting email accounts, 2FA is your front-line defense.
2FA Methods How to Set Up 2FA in Gmail: Two Simple Methods
Here are two easy methods to enable 2FA and fortify your Gmail security: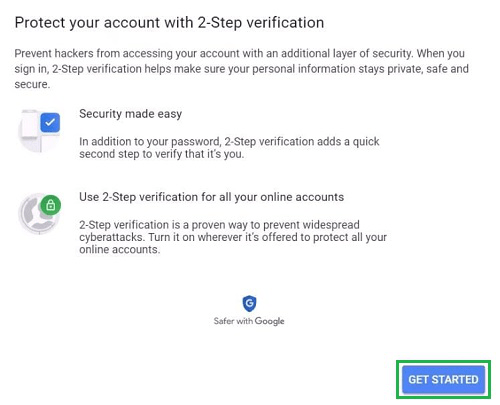
Method 1: Using SMS or Phone Calls
Follow these steps to enable 2FA using your mobile phone:
Step 1: Open Your Google Account and Access the Security Tab
Go to your Google Account (click on your profile picture). Select “Manage Your Google Account.” Click on the “Security” tab.
Step 2: Navigate to the 2-Step Verification Section
Scroll down to “Signing in to Google” and click on “2-Step Verification.”
Step 3: Click on Get Started
Review the information and click the “Get Started” button.
Step 4: Enter Your Mobile Number
Provide a valid mobile number and choose to receive verification codes via text message (SMS) or phone call. Click “Next.”
Step 5: Enter the Code Sent to Your Phone
Enter the verification code you receive and click “Next.”
Step 6: Turn On 2-Step Verification
Review the settings and click the “Turn On” button.
Step 7: Complete the 2-Step Verification Setup
You've successfully enabled 2FA. You’ll now need both your password and a verification code to sign in.
Method 2: Using Google Authenticator App
Here’s how to use the Google Authenticator app:
Step 1: Install Google Authenticator
Download the Google Authenticator app from the App Store or Google Play.
Step 2: Link Authenticator to Gmail
In Google Account Security, select “Authenticator App” under “2-Step Verification.”
Step 3: Set up with QR Code
Click “Set Up.” Scan the QR code with the app or manually enter the setup key > Click “Next.”
Step 4: Open App and Scan
Open the Authenticator app and scan the QR code.
Step 5: Verify and Save Backup Codes
Enter the time-based OTP generated by Google Authenticator > Click “Verify”. Download or print backup codes.
Troubleshooting Two-Factor Authentication (2FA) Tips
Encountering issues? Here are some troubleshooting tips:
Lost Access to Google Authenticator
Use backup codes. Navigate to “2-Step Verification” > “Replace Authenticator” > Re-scan QR code.
No SMS Verification Code Received
Check carrier signal. Use Google Prompt as a backup.
Disable 2-Step Verification Temporarily
Go to “Security” > “2-Step Verification” > “Turn Off” (requires password confirmation).
“2FA ensures your account stays safe even if your credentials are leaked.
Security Expert
Take Action Now!
Enhance your Gmail security with these resources:
Set Up 2FA
Get started with Two-Factor Authentication to protect your account.
Google Security Checkup
Review your security settings and identify potential vulnerabilities.
Backup Codes
Download or print your backup codes for emergency access.
Advanced Security Practices for 2024
Taking your security further:
Enable Google Prompt for faster logins.
Set up backup phone numbers for emergency access.
Monitor suspicious activity via Google’s Security Checkup.
Update recovery information every 6 months.
Consider using biometric authentication (fingerprint or face unlock) for added security.