Getting Started Creating Your First Google Form: A Step-by-Step Guide
Google Forms is a versatile and free tool for creating surveys, quizzes, and gathering information quickly and efficiently. Whether you need to collect feedback, register attendees, or build a quiz, Google Forms provides an intuitive platform to achieve your goals without any technical expertise.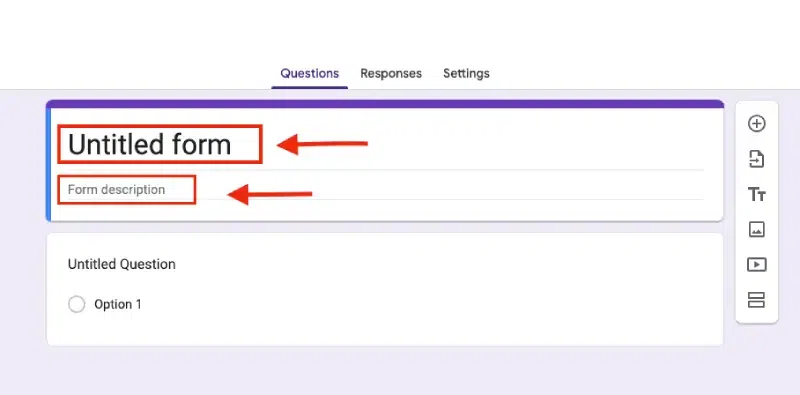
This guide will walk you through each step of creating, customizing, and analyzing your Google Forms, ensuring you can build professional-looking forms with ease. From understanding the basics to exploring advanced features, you'll become a Google Forms expert in no time. Let's get started!
The Basics How to Create a Google Form
Creating a Google Form is straightforward. Here's how:
Step 1: Sign In to Your Google Account: Go to Google Forms and log in with your Google account credentials. This is your gateway to creating and managing your forms.
Step 2: Start a New Form: Click the ‘+ Blank’ button to start a new form from scratch. Alternatively, you can explore pre-designed templates such as event registration, surveys, and feedback forms to save time.
Step 3: Add a Title and Description: Give your form a clear and concise name (e.g., “Customer Feedback Survey”) and add a description explaining its purpose to respondents. This helps set expectations.
Step 4: Add Questions: Click the 'Untitled Question' field to start adding questions. Choose from various question types (multiple choice, short answer, paragraph, checkboxes, dropdown, linear scale, date/time, and file upload) to suit your needs. Customize each question to collect specific information.
Step 5: Preview and Test: Before sharing, click the eye icon (preview) at the top right to ensure your form looks and functions as intended. This is crucial for a polished final product.
Step 6: Share Your Form: Click the 'Send' button to share your form via a link (email or social media), email directly, or embed it on your website for easy access. Consider your audience and choose the method that best suits them.
Responses and Data How to Collect and Analyze Responses
Once your Google Form is live, collecting and analyzing responses is simple:
Step 1: Link to Google Sheets: Go to the 'Responses' tab and click the Google Sheets icon to automatically sync responses in real-time. This simplifies tracking and analysis.
Step 2: View Responses: In the 'Responses' tab, view all submissions. Google Forms generates charts and graphs to help you identify trends.
Step 3: Download Responses: Download responses as a CSV file by clicking the three dots and selecting 'Download responses.' This allows you to use the data in programs like Excel.
“Google Forms simplifies the process of gathering information, allowing you to effortlessly collect and organize data.
Google Forms User
Key Google Forms Features
Explore the power and flexibility of Google Forms!
Question Types
Choose from multiple-choice, short answer, checkboxes, and more to collect the right data.
Customization
Personalize your forms with themes, images, and branding to match your style.
Real-Time Analysis
View responses instantly with auto-generated charts and graphs.
Integration
Seamlessly integrate with Google Sheets for detailed data analysis.
Enhance Your Form Adding Sections and Customizing Settings
Enhance your form for better organization and user experience:
Add Sections: Click the 'Add section' icon (two horizontal lines) to create distinct sections or sub-forms. This lets you organize your form into logical parts, improving readability.
Adjust Settings: You can customize your form's settings by managing how responses are collected and protected (collect email addresses, limit to one response, allow editing, and send responders a copy).
Make it a Quiz: Create quizzes and assign point values, set answers, and provide automated feedback to test knowledge effectively.
Customize Presentation: Manage how the form and responses are presented. Design your Google form by adding a header image, theme, background color, or change the font style.