Understanding Why Enable Enhanced Phishing Protection?
In today's digital landscape, phishing attacks pose a significant threat to your sensitive information. Enhanced Phishing Protection in Microsoft Defender acts as a crucial shield, actively identifying and blocking malicious websites, suspicious links, and fraudulent attempts.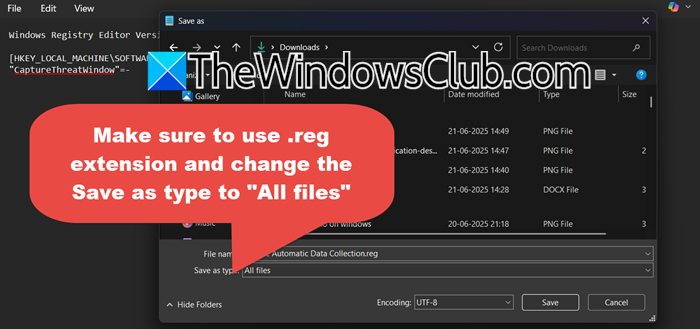
This feature is designed to protect your login credentials and personal data by monitoring apps, websites, and password entries in real-time. By enabling this layer of defense, you take a proactive step towards a safer browsing experience and more secure credential handling.
Method 1: Enabling via Windows Security
The easiest way to enable Enhanced Phishing Protection is through the Windows Security app. Here's how:
1. Open Windows Security: Search for 'Windows Security' in the Start Menu.
2. Navigate to App & browser control: Click on the 'App & browser control' tab.
3. Access Reputation-based protection settings: Select the 'Reputation-based protection settings' link.
4. Enable Phishing Protection: Scroll down to the 'Phishing protection' section and turn it 'On'. It's recommended to enable 'Warn me about malicious apps and sites' and 'Automatically collect website or app content when additional analysis is needed.'
5. Close Windows Security: Once enabled, exit the Windows Security app. This method is ideal for individual devices.
Method 2: Enabling via Group Policy Editor
For organizations or users wanting to apply the settings to multiple devices, the Group Policy Editor is the preferred method.
1. Open Run: Press Win + R, type gpedit.msc, and press Enter.
2. Navigate: Go to Computer Configuration > Administrative Templates > Windows Components > Windows Defender SmartScreen > Enhanced Phishing Protection.
3. Configure Settings: Double-click on the following settings and select 'Enabled': 'Automatic Data Collection', 'Notify Malicious', 'Notify Password Reuse', and 'Notify Unsafe App Service Enabled'.
4. Apply Changes: Click 'OK' after enabling each setting. Note: If certain options are unavailable, your Windows version may not support them.
Method 3: Enabling via Registry Editor
For Windows Home and Education editions (where Group Policy Editor is unavailable), use the Registry Editor. Important: Always back up your registry before making changes.
1. Backup Registry: Open Registry Editor (regedit.exe), go to File > Import, and save a backup.
2. Create .reg File: Open Notepad and paste the following code (adjust as needed):
`reg
Windows Registry Editor Version 5.00
[HKEY_LOCAL_MACHINE\SOFTWARE\Policies\Microsoft\Windows\WTDS\Components]
"NotifyPasswordReuse"=dword:00000000
[HKEY_LOCAL_MACHINE\SOFTWARE\Policies\Microsoft\Windows\WTDS\Components]
"Enable Automatic Data Collection for the current user"=dword:00000001
"Enable Notify Malicious for the current user"=dword:00000001
"Enable Notify Password Reuse for the current user"=dword:00000001
"Enable Notify Unsafe App for the current user"=dword:00000001
"Enable Phishing Protection for the current user"=dword:00000001
`
3. Save as .reg: Save the file with a .reg extension (e.g., enable_phishing.reg).
4. Import and Restart: Double-click the .reg file, confirm the prompts, and restart your device.
“Enhanced Phishing Protection acts as a crucial shield, actively identifying and blocking malicious websites.
Microsoft Defender Documentation
Interactive Guides & Tools
Enhance Your Security Knowledge
Downloadable PDF Guide
Get a detailed step-by-step guide on enabling phishing protection. Includes screenshots and troubleshooting tips.
Phishing Awareness Quiz
Test your knowledge of phishing attacks and learn how to identify them. Stay sharp and protect yourself.
Optional Disabling Phishing Protection
To disable Phishing Protection, follow the same steps as enabling it via Windows Security, but toggle the 'Phishing protection' setting to 'Off'. Note: Disabling this feature is generally not recommended due to the increased risk of phishing attacks. Consider the security implications before disabling.
Beyond Defender Additional Security Measures
While Microsoft Defender provides strong protection, consider supplementing it with additional security tools. Combine Defender with MalwareBytes for zero-day threats, Bitdefender for AI-based defense, and Norton 360 for comprehensive protection. Always practice good security habits like enabling two-factor authentication, updating software regularly, and being cautious of suspicious links.
Explore how to enable Microsoft Defender Advanced Threat Protection (ATP) in the Microsoft 365 Defender portal under Settings > Endpoints > Advanced Features.
Conclusion Strengthening Your Digital Fortress
Enabling Enhanced Phishing Protection in Microsoft Defender is a critical step toward safeguarding your data and your organization's data. By following these straightforward steps, you fortify your digital defenses and significantly reduce the risk of falling victim to phishing attacks.
Stay vigilant, stay protected. Regularly review and update your security settings to adapt to evolving cyber threats.